Install host ubuntu server minimalist
Enable OpenSSH Server
No Utility Selection
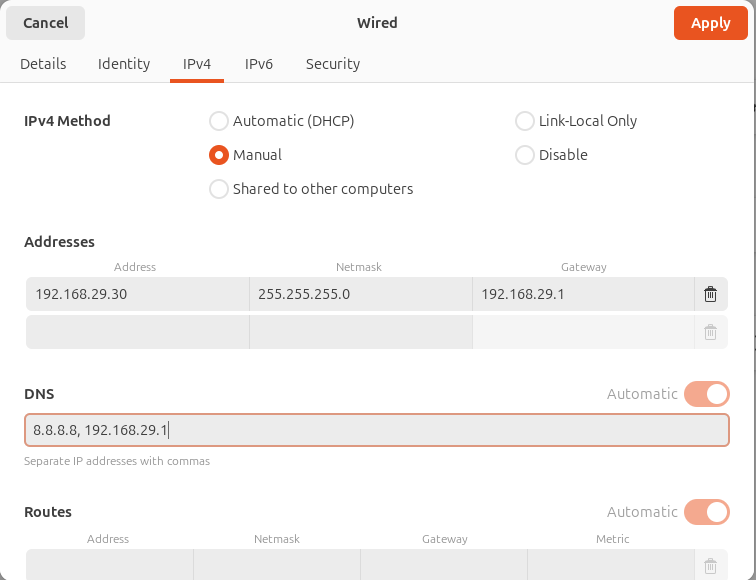
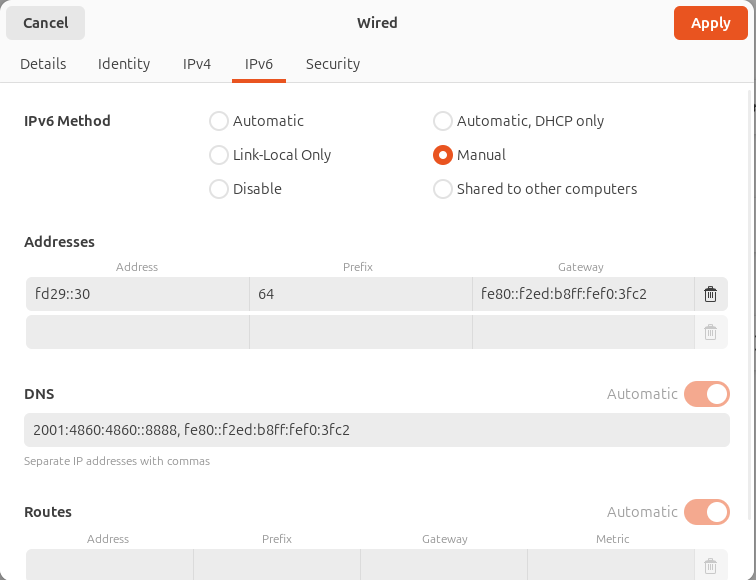
Below should be IPv4 and IPv6 configuration
#0
ip -6 route show default| Field | Value |
|---|---|
| IP | 192.168.29.30 |
| Subnet | 192.168.29.0/24 |
| Netmask | 255.255.255.0 |
| Gateway | 192.168.29.1 |
| DNS | 192.168.29.1 |
IPv6 Address: fd29::31 (for ds-h0-n1) / fd29::41 (for ds-h1-n1)
Subnet Prefix Length: 64 (Standard for most IPv6 networks)
Default Gateway: fe80::f2ed:b8ff:fef0:3fc2 (This represents your Jio Router)
Preferred DNS: 2001:4860:4860::8888 (Google DNS)
Alternate DNS: 2606:4700:4700::1111 (Cloudflare DNS)
#1
sudo apt update
sudo apt upgrade -y
sudo apt autoremove
sudo snap refresh
brew update
brew upgrade
brew cleanup
#2
sudo apt install -y cpu-checker
kvm-ok
#3
sudo apt install -y qemu-kvm libvirt-daemon-system libvirt-clients bridge-utils virtinst

# seems not needed, enabled even without this
sudo systemctl enable --now libvirtd
sudo systemctl status libvirtd
#4
sudo usermod -aG libvirt,kvm $USER
newgrp libvirt
newgrp kvm
#5
sudo virsh list --all
#6
# /etc/netplan/01-br0.yaml

network:
  version: 2
  renderer: networkd
  ethernets:
    <%intf%>:
      dhcp4: no
      dhcp6: no
  bridges:
    br0:
      interfaces: [<%intf%>]
      dhcp4: no
      dhcp6: no
      addresses:
        - 192.168.29.<%host%>/24
        - 2405:201:202d:70b2::<%host%>/64
      routes:
        - to: default
          via: 192.168.29.1
        - to: default
          via: "fe80::f2ed:b8ff:fef0:3fc2"
          on-link: true
      nameservers:
        addresses:
          - 8.8.8.8
          - 2001:4860:4860::8888
          - 1.1.1.1
          - 192.168.29.1
      parameters:
        stp: false
        forward-delay: 0
#7
# remove all other netplans except above
sudo chown root:root /etc/netplan/*.yaml
sudo chmod 600 /etc/netplan/*.yaml

sudo netplan apply
#8
ip addr show br0
#9
sudo mkdir -p /var/lib/libvirt/images/ubuntu24
cd /var/lib/libvirt/images/ubuntu24

sudo wget https://cloud-images.ubuntu.com/noble/current/noble-server-cloudimg-amd64.img

sudo chown -R libvirt-qemu:kvm .
sudo chmod -R 755 .
Make below file with name “user-<%host%>.yaml”
#10
#cloud-config

hostname: ds-<%host%>
timezone: Asia/Kolkata

users:
  - default
  - name: ds
    groups: sudo
    shell: /bin/bash
    sudo: ALL=(ALL) NOPASSWD:ALL
    ssh_authorized_keys:
      - <%key%>

package_update: true
package_upgrade: true

packages:
  - curl

runcmd:
  - echo "Cloud-init finished" > /var/log/cloud-init.done
Make below file with name “meta-<%host%>.yaml”
#11
instance-id: ds-<%host%>
local-hostname: ds-<%host%>
Make below file with name “network-<%host%>.yaml”
#12
#network-config

network:
  version: 2
  renderer: networkd
  ethernets:
    any-net:
      match:
        name: "enp*"
      dhcp4: no
      dhcp6: no
      addresses:
        - 192.168.29.<%host%>/24
        - 2405:201:202d:70b2::<%host%>/64
      routes:
        - to: default
          via: 192.168.29.1
        - to: default
          via: "fe80::f2ed:b8ff:fef0:3fc2"
          on-link: true
      nameservers:
        addresses:
          - 8.8.8.8
          - 2001:4860:4860::8888
          - 1.1.1.1
          - 192.168.29.1
#13
sudo apt install -y cloud-image-utils

sudo chmod u+s /usr/lib/qemu/qemu-bridge-helper

sudo mkdir -p /etc/qemu/
echo "allow br0" | sudo tee /etc/qemu/bridge.conf
sudo chown root:root /etc/qemu/bridge.conf
sudo chmod 0644 /etc/qemu/bridge.conf

sudo systemctl restart libvirtd
systemctl status libvirtd --no-pager
#14
sudo cloud-localds --network-config=network-<%host%>.yaml seed-<%host%>.iso user-<%host%>.yaml meta-<%host%>.yaml
sudo qemu-img create -f qcow2 -F qcow2 -b noble-server-cloudimg-amd64.img node-<%host%>.qcow2 30G

qemu-img info node-<%host%>.qcow2

sudo chown libvirt-qemu:kvm seed-<%host%>.iso node-<%host%>.qcow2
sudo chmod 644 seed-<%host%>.iso node-<%host%>.qcow2
Below needs to be run directly in bash by copying.
#15
sudo virt-install \
  --name ds-<%host%> \
  --memory 4096 \
  --vcpus 4 \
  --disk path=node-<%host%>.qcow2,format=qcow2 \
  --disk path=seed-<%host%>.iso,device=cdrom \
  --os-variant ubuntu24.04 \
  --network bridge=br0,model=virtio \
  --graphics none \
  --import
After installation completes press “Ctrl + ]” to return to host prompt.
#16
# Look neighbours for IP
ip neigh
sudo ip neigh flush dev br0

# Look router for IP from the mac address
sudo virsh domiflist ds-<%host%>
sudo virsh domifaddr ds-<%host%>
#17
sudo virsh console ds-<%host%>
# Press enter to goto VM's prompt

sudo apt install -y iputils-ping
ping all nodes from each other
#18
sudo virsh destroy ds-<%host%>
sudo virsh undefine ds-<%host%> --remove-all-storage
# It will remove seed-<%host%>.iso & node-<%host%>.qcow2

for vm in $(sudo virsh list --all --name); do sudo virsh shutdown "$vm"; done
for vm in $(sudo virsh list --all --name); do sudo virsh start "$vm"; done
Userful Commands
#19
lsblk
sudo lvextend -l +100%FREE /dev/ubuntu-vg/ubuntu-lv
df -T /
sudo resize2fs /dev/ubuntu-vg/ubuntu-lv
df -T /